Why Choose Lighting That Highlights Architectural Models?

Time:2026-09-20 Author:Oliver
0%

Choosing the right illumination can determine whether an architectural model feels convincing or strangely flat. The question is not simply how bright the display should be. It is how to choose lighting that highlights real estate architectural models without hiding their scale, materials, or circulation.

The International Energy Agency reported in its Energy Efficiency 2019 analysis that lighting represented about 15% of global electricity consumption and approximately 5% of global greenhouse-gas emissions. This makes efficient LED specification more than a visual decision. It also supports responsible exhibition planning. The U.S. Department of Energy notes that LEDs can use at least 75% less energy than incandescent lamps and last much longer. Still, efficiency alone does not create quality. A narrow beam may sharpen a tower façade but produce harsh shadows across balconies. A wider beam can reveal the site plan, yet flatten important depth.

Architectural lighting designer Richard Kelly wrote, “Light is not something that reveals, it is something that reveals itself.” His observation remains practical for property presentations. Use adjustable fixtures, high color rendering, and controlled contrast. Test the model at eye level. Check windows, rooflines, trees, and recessed entrances under different angles. CIE guidance and modern TM-30 evaluation also remind designers that color quality involves more than a single CRI number. That detail is easy to overlook.

A 3000K source may flatter warm timber, but it may distort cool concrete. Sometimes the “best” setting looks impressive in photographs and weak in person. That is the part worth reconsidering. Lighting should support confident decisions, not merely create a dramatic first impression.
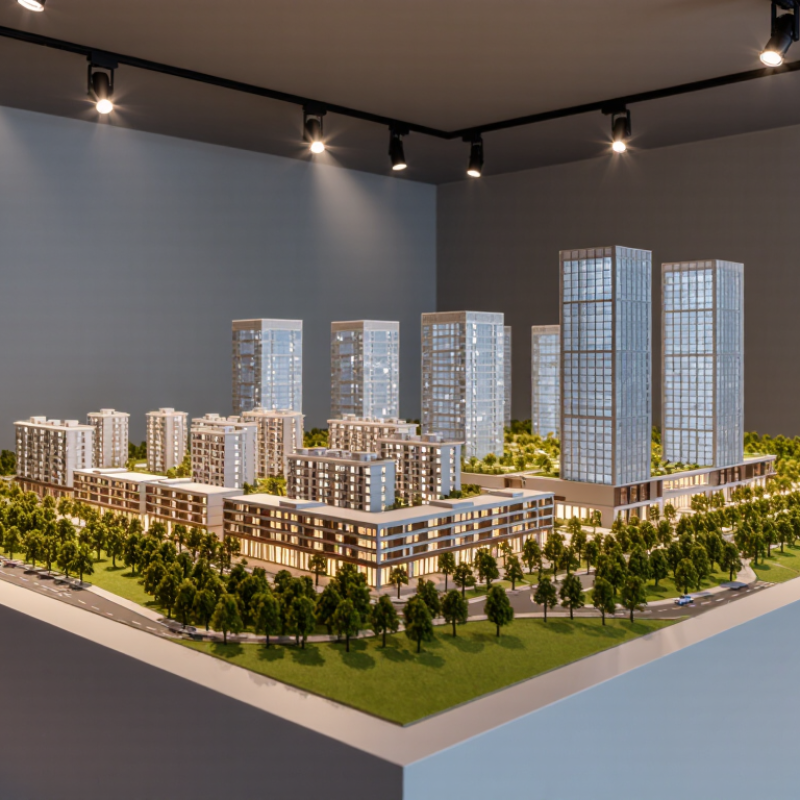
Why Choose Lighting That Highlights Architectural Models?

Defining Architectural Model Lighting and Its Purpose

Architectural model lighting is a miniature system that reveals form, depth, material, and movement. Its purpose is not simple brightness. It helps viewers understand how sunlight, circulation, structure, and interior space may work together.

In practice, I begin with the model’s viewing distance and scale. A narrow beam can emphasize a roof edge, while a soft side light reveals a recessed courtyard. Small LEDs should avoid direct glare and uneven hotspots. Color temperature also matters. Warm light may support residential warmth, while neutral light often clarifies concrete, glass, and timber. Scale changes everything.

The International Energy Agency’s Energy Efficiency 2023 report states that lighting uses about 15% of global electricity. The U.S. Department of Energy also reports that LED products can use at least 75% less energy than incandescent lighting. These figures support efficient choices, even in temporary presentation models. However, energy savings cannot replace visual accuracy. A very efficient light can still flatten a façade or distort material color.

I have sometimes added too many fixtures, thinking more detail would create more realism. It usually creates visual noise. A better approach is measured contrast: brighter focal zones, controlled shadow, and enough ambient light for orientation. Illuminance readings can help, but they do not replace observation. Walk around the model. Check glare from eye level. Then adjust the lighting again.

How Focused Lighting Reveals Form, Scale, and Structural Details

Focused lighting does more than make an architectural model look attractive. It reveals the relationships that explain the design. A narrow beam can trace a roof edge, while softer side light shows wall depth and recessed openings. In my model-display work, I have found that shadows often communicate scale better than brightness. A tiny balcony feels believable when its railing casts a fine, controlled shadow.

Lighting also exposes structural details that general room lighting can flatten. A low-angle source can emphasize columns, slabs, and circulation paths. Neutral white light usually preserves material colors, while a high color-rendering value helps distinguish concrete, timber, and translucent surfaces. Too much intensity creates glare. I still make this mistake when working quickly. The brightest setting is rarely the most informative. A viewer should notice form before the light source.

Tips: Start with one key light and observe the shadow direction. Keep the beam slightly above eye level. Test narrow and wide beam angles from the same position. Use a small scale figure for comparison. Check the model from several viewing distances. If details disappear, adjust contrast before increasing brightness. A short test photograph can reveal problems that the eye misses. Record the setup, because recreating a successful arrangement is harder than expected.

The Role of Light in Improving Model Presentation and Interpretation

Architectural models communicate more than form. Light helps viewers read that communication with greater accuracy. A carefully placed source can reveal a roof’s slope, a recessed window, or the depth of a narrow courtyard. In model reviews, I have seen small lighting changes alter the perceived scale completely. Soft side lighting usually exposes texture without producing harsh shadows. Even so, bright lighting is not always better.

Light also guides interpretation. A focused beam can direct attention toward an entrance, circulation route, or public space. Balanced illumination keeps secondary details visible without competing for attention. This matters when several people study the model from different angles. Their understanding should not depend on standing in one perfect position. A neutral color temperature often supports reliable material comparison, although real materials may appear warmer under exhibition lighting.

There is no flawless lighting formula. I have sometimes used dramatic contrast to make a model memorable, then noticed that important details disappeared. That mistake is useful. It shows why lighting should support the design rather than decorate it. Test the model at eye level. Move the light gradually. Watch how shadows cross façades, steps, and landscape elements. A small adjustment can clarify structure, but excessive brightness can flatten it. The most effective presentation leaves enough visual space for viewers to question, inspect, and interpret the architecture themselves.

Key Lighting Choices for Different Architectural Model Materials

Why Choose Lighting That Highlights Architectural Models?

Architectural models do not communicate clearly under random lighting. Material, surface texture, and scale all affect how light should behave. In my model displays, I have found that the same fixture can flatter one material and damage another.

White foam board needs soft, even illumination. A diffused light from above reduces harsh shadows and keeps small edges visible. Wood models benefit from a warmer tone, usually between 2700K and 3500K. This reveals grain without making the surface look orange. Acrylic and glass require careful side lighting. A narrow beam can emphasize transparency, but it may also create distracting reflections. Dark metal models often need angled light from two directions. This preserves form and prevents large areas from disappearing.

Keep the light source slightly away from the viewing line. Glare quickly hides windows and delicate details. For translucent resin, I prefer gentle backlighting with a diffuser between the source and model. It creates depth without exposing bright hotspots. High color rendering also matters, especially when comparing façade colors or landscape materials. I once used a light that looked accurate to my eyes, yet it flattened pale concrete tones in photographs. That mistake changed my testing process. I now check the model from several angles and review both direct viewing and camera images. The result is not always perfect, but small adjustments often reveal structure that a brighter lamp cannot.

Why Choose Lighting That Highlights Architectural Models?

Material reflectance affects how much light is returned to the viewer, while color temperature influences the model’s visual character. Matte white surfaces usually need softer, lower-intensity illumination to prevent glare; darker wood benefits from warmer light, while translucent materials are often clearer under neutral-to-cool light that reveals depth and edges.

Practical Factors for Selecting Effective Model Lighting

Why Choose Lighting That Highlights Architectural Models?

Practical Factors for Selecting Effective Model Lighting

Effective model lighting begins with legibility, not decoration. A well-lit miniature should reveal roof lines, recessed windows, material changes, and circulation paths. In practice, I start with 200–500 lux on the model surface. This range supports detail without making white surfaces look harsh. The exact level depends on scale, finish, and viewing distance. The International Energy Agency’s Energy Efficiency 2023 report notes that lighting uses about 15% of global electricity. Efficient fixtures matter, even in small studios. Yet energy savings should not weaken visual accuracy.

Colour quality is equally important. Choose a source with a high colour-rendering score, ideally above 90, and check its TM-30 results. The Illuminating Engineering Society’s TM-30 method measures fidelity and colour gamut more completely than CRI alone. A neutral 3000–4000 K tone often keeps concrete, timber, and white card believable. Beam angle also deserves attention. A narrow beam can sharpen a tower but create distracting shadows behind it. Diffused side light may show texture better. I have sometimes over-lit a model and lost its depth. That mistake is useful, because brightness cannot repair poor direction.

Tips: Place lights above eye level and test them from the viewer’s position. Use a matte sample beside the model to check glare. Rotate the model slowly before final placement. Leave some shadows; perfectly even lighting can make architecture look flat. Record lux, colour temperature, and beam position for repeatable presentations. The CIE 224:2017 guidance on colour fidelity supports evaluating light beyond a single colour-rendering number.

Why Choose Lighting That Highlights Architectural Models? - Practical Factors for Selecting Effective Model Lighting

Selection Factor Practical Recommendation Useful Target or Range Why It Matters for Architectural Models Selection Check
Color Rendering Choose lighting with a high color-rendering index for accurate material and landscape presentation. CRI 90 or higher for presentations; CRI 80 or higher for general display areas. High color rendering helps concrete, timber, glass, vegetation, and accent colors appear closer to their intended appearance. Verify the CRI value in the technical specification rather than relying on appearance alone.
Color Temperature Match the light color to the intended atmosphere and the surrounding room lighting. 2700–3000 K for warm residential scenes; 3500–4100 K for neutral studio or gallery scenes; 5000–6500 K for daylight simulation. A consistent color temperature prevents the model from looking visually disconnected from its presentation environment. Use adjustable or interchangeable lighting when the model will support different design scenarios.
Illuminance Provide enough light to reveal details without creating excessive brightness or reflections. Approximately 300–750 lux on the model surface, adjusted for materials, viewing distance, and ambient light. Balanced illuminance improves visibility of façade texture, openings, circulation paths, and scale details. Measure at model level where possible; do not judge brightness only from the fixture output rating.
Beam Angle Use narrow beams for focal elements and wider beams for overall model coverage. 15–30° for accents; 30–60° for general highlighting; wider than 60° for broad, even coverage. The correct beam angle controls emphasis and reduces dark patches across roofs, courtyards, and building edges. Compare the beam spread with the distance between the light source and the model.
Uniformity Combine overlapping light distributions instead of relying on a single intense source. Aim for a uniformity ratio of at least 0.60 for general model presentation areas. Even coverage allows viewers to read the complete composition rather than focusing only on the brightest zone. Check corners, recessed spaces, and areas behind taller structures for under-lighting.
Glare Control Select shielded, louvered, recessed, or carefully aimed fixtures. Use a glare rating appropriate to the space; UGR below 19 is commonly used for comfortable indoor visual tasks. Reduced glare keeps transparent surfaces and glossy finishes readable while improving viewer comfort. View the model from normal eye level and from common walking paths before finalizing fixture positions.
Shadow Quality Use directional light to define form, supported by softer fill light to retain recessed details. Use one dominant direction with lower-intensity fill; exact levels depend on the desired visual narrative. Controlled shadows reveal massing, depth, façade articulation, and the relationship between volumes. Avoid shadows that hide important entrances, courtyards, streets, or structural features.
Flicker Performance Choose lighting with stable output and a well-designed driver, especially for filmed or photographed presentations. Prefer products tested for low temporal light modulation; performance varies by driver and dimming method. Low flicker reduces visible banding in camera footage and can improve visual comfort during extended reviews. Test the actual fixture with the intended dimmer and camera settings.
Heat and Material Safety Prefer efficient, low-heat sources and maintain adequate ventilation around enclosed fixtures. LED systems are generally suitable because they produce less radiant heat than incandescent or halogen sources. Lower heat helps protect paper, foam board, plastics, adhesives, paints, and delicate vegetation details. Check surface temperature, ventilation, and minimum clearance requirements during extended operation.
Dimming and Scene Control Use smooth dimming and programmable scenes for daylight, evening, and presentation modes. Provide independent control for ambient, accent, and façade lighting zones. Flexible control lets reviewers compare design intent, circulation, public space, and nighttime identity. Confirm compatibility among fixtures, drivers, dimmers, and control interfaces.
Energy Efficiency Compare efficacy, operating hours, standby consumption, and control capability. LED fixtures commonly provide approximately 80–150 lumens per watt, depending on design and operating conditions. Efficient lighting reduces operating cost and heat load, particularly for models displayed continuously. Evaluate system efficacy rather than comparing the light source alone.
Maintenance and Access Install accessible fixtures with replaceable or serviceable components where practical. Plan routine cleaning and inspection; LED rated life is often specified around 25,000–50,000 hours, depending on conditions. Simple maintenance preserves consistent brightness and prevents dust from obscuring fine model details. Allow safe access without moving or damaging the architectural model.
Fixture Integration Select compact, low-profile fixtures that can be concealed within the display structure or ceiling system. Size and mounting method should be determined by model scale, viewing distance, and available clearance. Well-integrated lighting keeps attention on the design while avoiding visual clutter around the model. Confirm mounting strength, cable routing, ventilation, and safe separation from model materials.

Note: Recommended values are practical starting points. Final lighting levels should be verified on site according to model materials, room finishes, viewing distance, display purpose, and local electrical and safety requirements.

FAQS

What is architectural model lighting used for?

It reveals form, depth, material, structure, and circulation. It is not merely about making the model brighter. Good lighting helps viewers understand how spaces may work together.

How bright should an architectural model be?

A practical starting range is 200–500 lux on the model surface. Adjust this range for scale, finish, and viewing distance. Too much brightness can make white surfaces harsh. More light is not always better.

Which colour temperature works well for model lighting?

A neutral range of 3000–4000 K often preserves concrete, timber, glass, and white card. Warmer light can suggest residential comfort. Check the actual materials before deciding. Colour can behave unexpectedly.

Why does beam angle matter?

A narrow beam can define a roof edge or tower profile. A wider beam creates softer shadows across walls and courtyards. Test both angles from the same position. Small changes matter.

How can focused lighting reveal structural details?

Low-angle light can emphasize columns, slabs, balconies, and circulation paths. A balcony railing may cast a fine shadow on the wall below. This shadow can make scale easier to read. Brightness alone cannot create that effect.

How many lights should an architectural model use?

Begin with one key light and observe its shadow direction. Add gentle ambient light only when important areas disappear. Too many fixtures create visual noise. I have made that mistake.

Where should model lights be positioned?

Place most lights slightly above eye level. Check glare from the viewer’s normal position. Rotate the model slowly before fixing the final placement. A side light may reveal a courtyard better than overhead light.

How can lighting preserve material colour?

Choose a high colour-rendering score, preferably above 90. Review additional colour-fidelity information when available. Neutral light usually keeps concrete, timber, and translucent surfaces believable. Photographs may still show different colours.

How can energy use be reduced without losing visual accuracy?

Efficient small lights can reduce electricity use during temporary presentations. Use only the fixtures that improve legibility. Turn off unnecessary background lighting. Energy savings cannot correct poor direction or distorted colour.

How should a successful lighting setup be documented?

Record lux, colour temperature, beam position, and viewing distance. Take a short test photograph from eye level. Walk around the model and inspect shadows. My own setups are not always repeatable.

Conclusion

Architectural model lighting is more than a way to make a display brighter; it is a tool for revealing the design’s form, scale, circulation, and structural details. Carefully directed light can emphasize elevations, rooflines, openings, textures, and spatial relationships, helping viewers understand the project more quickly and accurately. It also improves presentation quality by creating visual hierarchy, reducing confusing shadows, and guiding attention toward the most important features of the model.

Choosing the right lighting requires considering the model’s materials, color, surface finish, size, and display environment. Softer illumination may suit delicate paper or foam details, while controlled directional light can define transparent, textured, or highly dimensional elements. When deciding how to choose lighting that highlights real estate architectural models, evaluate brightness, color temperature, beam direction, shadow control, energy use, installation flexibility, and viewing distance. Effective lighting should support interpretation without overpowering the architecture, producing a balanced and professional presentation.

Oliver

Oliver

Oliver is a seasoned marketing professional with a wealth of expertise in driving brand awareness and engagement. With a deep understanding of our company's product offerings, he consistently delivers high-quality content that enriches our professional blog. His insights not only shed light on......