A multifunctional hotel hall must work harder than a conventional lobby. It may welcome guests, host conferences, support weddings, and become a quiet lounge. Each function changes the required brightness, contrast, color appearance, and visual focus. Therefore, “how to design a lighting layout for a multi-functional hotel hall” begins with understanding movement, timing, and human comfort. The plan should follow the hall’s real activities, not only its architectural drawing.
Howard M. Brandston, a respected lighting designer and educator, said, “Good lighting is not about how much light you have, but about where you put it.” This principle remains practical. Place soft ambient light along circulation routes. Add controlled accent light above reception desks, artwork, and temporary stages. Use dimmable layers, carefully aimed beams, and scenes that adapt without creating dark corners. Guests should see faces clearly near registration areas. Speakers need balanced vertical light. Tables should feel bright, but not exposed.
A reliable design also considers glare, shadows, maintenance access, emergency lighting, and energy performance. IES and CIBSE guidance can support technical decisions, while local codes must guide final specifications. Photometric calculations are valuable, yet they cannot fully predict reflections from polished stone or camera glare during an event. A site mock-up is wiser. Sometimes the first layout looks impressive but feels uncomfortable. That failure matters. Observe the hall at night, test several scenes, and revise the plan after real users respond. Good hotel lighting is not merely decorative. It quietly organizes attention, mood, safety, and memory.
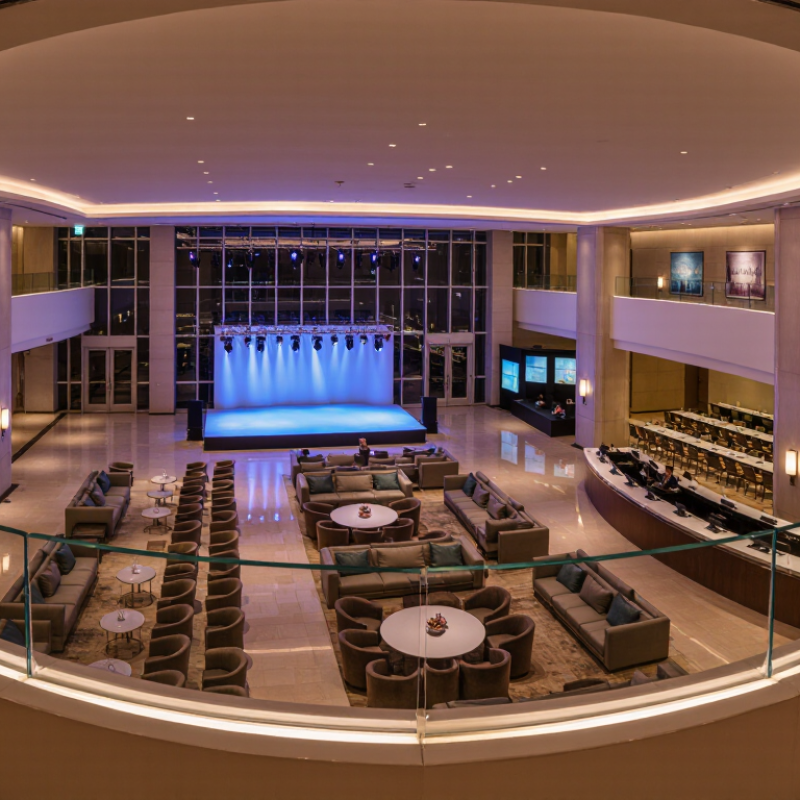
How to Design a Multifunctional Hotel Hall Lighting Layout?
Define each hotel hall zone before selecting fixtures. The entrance needs bright, welcoming light for clear movement and first impressions. Reception requires balanced vertical illumination on faces and desks. Lounge areas benefit from softer, warmer light that supports conversation. Corridors, lift lobbies, and event entrances need stronger guidance cues. Do not treat the hall as one large room. Each zone serves a different activity.
On site, I usually map guest routes during daytime and evening hours. Reception lighting may need around 200–300 lux, while lounge seating often works better near 100–200 lux. Exact levels should follow local codes and an experienced lighting professional’s assessment. Use layered lighting: ambient fixtures for general visibility, accent light for artwork, and task lighting at service points. Good color rendering helps guests read materials and recognize skin tones naturally. Keep glare away from polished floors and reception screens.
Daylight changes the design throughout the day. Dimming controls should respond without making the hall feel suddenly dark. Emergency lighting must remain separate and clearly coordinated with the main layout. A perfectly even ceiling can look flat and forgettable. My early concepts often used too many identical fixtures, which weakened the sense of place. Testing a small mock-up can reveal uncomfortable shadows, harsh reflections, or weak wayfinding before installation. Wide circulation zones also need enough vertical light for signs and room numbers.
Recommended maintained illuminance levels for key hotel hall zones, supporting orientation, visual comfort, and guest activities.
Event and reception areas require higher illuminance for guest interaction and visual tasks, while circulation and waiting zones can use lower levels to create a comfortable atmosphere. Final values should be adjusted for daylight, surface reflectance, accessibility, and the hotel’s interior design concept.
A hotel hall should not be lit as a single bright box. During a site review, record daylight in the morning, at noon, and after sunset. Note glare on polished floors, dark corners near elevators, and changing shadows near the entrance. Large windows may provide comfort, yet direct sun can make reception screens unreadable. Use softer ambient lighting near the façade, then add controlled task lighting at desks and security points. Keep the visual color consistent across these zones. I once underestimated afternoon glare. The drawings looked balanced, but guests still shaded their eyes. That mistake changed my survey process.
Ceiling structure dictates more than fixture placement. Exposed beams, sprinklers, ducts, and acoustic panels create separate lighting fields. Map these elements before selecting mounting positions. Recessed units need clear depth, while suspended fittings require strong support and maintenance access. A lower ceiling above a waiting area can feel oppressive under concentrated downlights. Wider distribution usually feels calmer there. Avoid placing every fixture on one rigid grid. It can ignore columns and create bright stripes across the floor. Leave access routes for cleaning and replacement. Practical details matter.
Visitor movement should shape lighting intensity and direction. People entering from a bright street need a gentle visual transition, not an abrupt dim lobby. Guide attention with brighter vertical surfaces at reception, lifts, and key corridors. Keep walking paths evenly lit, especially where luggage wheels cross floor changes. Seating areas can feel quieter with lower levels and limited glare. Test the layout with staff and visitors at night. Watch where they hesitate. Our first plan made a decorative wall too bright, pulling guests away from reception. It looked impressive, but it weakened wayfinding. Revise after observation.
A multifunctional hotel hall needs more than attractive illumination. It must support arrival, registration, conversation, events, and quiet waiting. Start by layering ambient, accent, task, and decorative lighting. Use recessed downlights for general visibility, linear fixtures for even ceiling coverage, and adjustable spotlights for artwork or reception details. Wall washers can soften tall surfaces. Avoid placing every fixture on one rigid grid.
Fixture selection should follow the hall’s architecture and operating needs. Choose low-glare optics near seating and glossy stone floors. Use high color-rendering sources so skin tones, flowers, and printed materials look natural. A suspended decorative fixture may create a focal point, but it should not block sightlines or cause reflected glare. Test one ceiling bay at full output and dimmed output. Small mockups reveal problems that drawings hide.
Color temperature should match the atmosphere and adjacent spaces. Warm white light around 2700–3000K can make lounges feel welcoming, while 3000–3500K may support reception desks and event setups. Keep transitions gradual. Otherwise, the hall can feel visually fragmented. The control system should provide scenes such as arrival, banquet, cleaning, and presentation, with independent zones for perimeter lighting and daylight response. Occupancy sensors can reduce waste, but sensor delays may frustrate staff. Commission the system with hotel operators, then revise the scenes after real events. A technically correct layout can still feel wrong at midnight.
How to Design a Multifunctional Hotel Hall Lighting Layout?
Develop Layered Lighting Plans for Ambience, Safety, and Visual Comfort
A hotel hall must support arrival, conversation, navigation, and quiet waiting. One lighting layer cannot handle these different needs well. Begin with soft ambient light across the ceiling, then add focused illumination near reception desks, seating areas, artwork, and circulation routes. A practical target is often 200–300 lux for general movement, with brighter task zones where guests read or complete forms. Local regulations and site conditions should guide the final levels.
Use wall washing to create gentle visual rhythm without producing harsh reflections on polished floors. Low-glare downlights can define pathways, while concealed linear fixtures soften dark corners. Keep brightness changes gradual. Guests moving from a bright entrance into a dim lounge may feel uncomfortable, even when the average lux level seems acceptable. At night, reduce decorative output and preserve clear stair, elevator, and exit visibility.
I have found that mock-ups reveal problems drawings cannot. A sample ceiling bay can expose glare on glass doors or shadows across a check-in counter. The first plan is rarely perfect. I still miss small contrast issues when reviewing only digital models. Test the layout at eye level, during daylight and evening hours. Ask staff and guests where they hesitate, squint, or avoid sitting. Then adjust aiming angles, dimming scenes, and color consistency before installation. Lighting controls should remain simple enough for staff to operate confidently.
How to Design a Multifunctional Hotel Hall Lighting Layout?
A hotel hall must support arrivals, conferences, dining, and evening events. Design the lighting in layers: ambient, task, and accent. Place adjustable downlights along circulation paths, then add wall washing near reception and artwork. Keep glare away from guests’ eyes and camera lenses. The Illuminating Engineering Society recommends reviewing illuminance, uniformity, glare, and color quality together, not separately. That sounds obvious. It is often missed.
Coordinate installation before ceilings close. Reserve access panels near drivers, control modules, and junction points. Use addressable controls with occupancy sensors, daylight response, and scene presets. The International Energy Agency reports that lighting represents about 15% of global electricity consumption. The U.S. Department of Energy states that LED lighting uses at least 75% less energy and can last up to 25 times longer than incandescent lighting. These figures support efficient design, but controls still need commissioning. A poorly programmed system wastes energy quietly. Color consistency also matters; a warm lobby scene should not make reception desks look green.
Tips: Use separate circuits for lobby, corridor, event, and cleaning scenes. Label every driver. Keep spare components documented. Test dimming with real furniture, polished stone, and evening daylight. Future adaptability requires empty conduit routes and accessible control hardware. Do not overdesign every zone. Some flexibility can increase cost and confusion. A practical review should include facility staff, installers, and event operators. Their feedback may expose an inconvenient truth: the most elegant layout can be difficult to maintain.
| Hall Zone | Primary Function | Recommended Illuminance | Color Temperature | Lighting Equipment | Control Strategy | Installed Load Target | Maintenance Approach | Future Adaptability |
|---|---|---|---|---|---|---|---|---|
| Main Entrance and Arrival Area | Welcome guests, support wayfinding, and create a clear transition from outdoor to indoor space. | 200–300 lux Uniformity ≥ 0.40 |
3000–3500 K Warm neutral white |
Recessed LED downlights, linear ceiling lights, and vertical wall-washing fixtures. | Daylight sensor near glazed façades; occupancy-based dimming during low-traffic periods. | 8–12 W/m² | Use accessible drivers and modular LED units; clean lenses every 12–18 months. | Provide spare circuit capacity and adjustable aiming tracks for future signage or artwork. |
| Reception and Concierge Desk | Enable accurate face recognition, document handling, check-in activities, and visual communication. | 300–500 lux Uniformity ≥ 0.60 |
3000–4000 K Neutral white |
Low-glare recessed luminaires, suspended task lighting, and concealed vertical illumination. | Separate task, ambient, and decorative scenes; manual override at the reception desk. | 10–14 W/m² | Select low-glare optics and replaceable drivers; maintain consistent light levels at work surfaces. | Use addressable control zones so the desk layout can be reconfigured without rewiring the entire hall. |
| Guest Lounge and Waiting Area | Support reading, conversation, relaxation, and informal guest meetings. | 100–200 lux Reading points: 300 lux |
2700–3000 K Warm white |
Decorative pendants, table lamps, floor lamps, and dimmable indirect ceiling lighting. | Scene presets for daytime, evening, events, and cleaning; local dimming for seating groups. | 6–10 W/m² | Use replaceable lamps or serviceable LED modules in decorative fixtures; keep access routes clear. | Provide floor boxes and capped power/data points for future furniture or charging stations. |
| Circulation and Lift Lobby | Provide safe movement, reinforce directional cues, and connect the hall with vertical circulation. | 100–200 lux Uniformity ≥ 0.40 |
3000–3500 K Warm neutral white |
Continuous linear lighting, wall washers, and recessed downlights at decision points. | Occupancy sensors with gradual dimming; maintain a safe minimum background level. | 5–8 W/m² | Use grouped circuits and accessible inspection points; check sensor operation during quarterly inspections. | Reserve conduit routes for additional directional signs, digital displays, and emergency equipment. |
| Flexible Event and Exhibition Area | Accommodate receptions, exhibitions, presentations, seasonal installations, and temporary displays. | 200–500 lux Adjustable by event type |
3000–4000 K Selectable where possible |
Dimmable track lights, tunable white fixtures, high-output linear luminaires, and wall washers. | Scene-based digital control with separate circuits for general, display, stage, and decorative lighting. | 12–18 W/m² | Install accessible tracks and quick-release fixtures; maintain spare drivers and compatible adapters. | Use a regular ceiling grid, spare control addresses, and flexible mounting points for changing layouts. |
| Restaurant or Café Frontage | Highlight entrances, menus, food presentation, and seating boundaries without causing glare. | 150–300 lux Counter or menu: 300–500 lux |
2700–3000 K Warm white |
Decorative pendants, accent spotlights, under-shelf lighting, and concealed cove lighting. | Independent controls for signage, dining, display, and cleaning modes; occupancy scheduling after closing. | 8–14 W/m² | Choose sealed fixtures in areas exposed to grease or moisture; clean optical surfaces more frequently. | Provide adjustable accent positions for menu boards, seasonal displays, and future tenant changes. |
| Conference Pre-Function Area | Support registration, networking, queue management, and spillover activities from meeting rooms. | 200–300 lux Registration desk: 300–500 lux |
3000–3500 K Neutral warm white |
Linear indirect lighting, recessed downlights, wall washers, and accent lighting at signage. | Link lighting scenes with event schedules; occupancy detection controls nonessential decorative layers. | 8–12 W/m² | Use standardized luminaires across adjacent rooms to simplify stocking and replacement. | Separate lighting zones by meeting-room entrance and allow later integration with room-booking systems. |
| Architectural Feature and Artwork Zone | Emphasize columns, textured walls, sculptures, plants, and hotel identity elements. | 300–750 lux For artwork, subject to conservation needs |
3000–3500 K High color rendering |
Adjustable accent spotlights, wall washers, concealed linear fixtures, and low-voltage display lighting. | Independent dimming and aiming; scheduled scenes for daytime, evening, and private events. | 4–10 W/m² | Use lockable aiming mechanisms and maintain documented aiming positions for efficient servicing. | Install track systems with spare capacity and provide flexible connection points for rotating exhibits. |
| Back-of-House Access and Service Edge | Support staff movement, deliveries, housekeeping, and service operations while minimizing visible equipment. | 150–200 lux Task locations: 300 lux |
3500–4000 K Neutral white |
Surface-mounted linear LED fixtures, impact-resistant bulkheads, and service-area task lights. | Occupancy sensors and time scheduling; manual override for deliveries and cleaning operations. | 5–9 W/m² | Use durable, easily cleaned housings and accessible junction boxes; inspect after construction changes. | Keep service routes and junction points accessible so future partitions or equipment can be added safely. |
| Emergency and Egress Lighting | Maintain safe evacuation routes, identify exits, and provide illumination during power interruptions. | Minimum 1 lux Along defined escape routes, subject to local code |
Typically 4000 K Clear neutral white |
Self-contained or centrally monitored emergency luminaires, exit signs, and anti-panic lighting. | Automatic emergency operation with scheduled testing and fault monitoring where permitted. | Dedicated low-load circuit | Perform functional tests monthly and duration tests at intervals required by applicable regulations. | Coordinate spare capacity, test access, and updated escape-route drawings whenever the hall layout changes. |
Daylight changes throughout the day. Record conditions in the morning, at noon, and after sunset. Check glare, shadows, and dark corners near elevators. A polished floor may reflect strong afternoon sunlight.
Direct sun can make reception screens difficult to read. Use softer ambient light near large windows. Add controlled task lighting at desks. Test the area when sunlight is strongest.
Beams, sprinklers, ducts, and acoustic panels divide the ceiling into separate lighting fields. Map them before selecting fixture positions. Recessed units need enough depth. Suspended fittings need secure support and maintenance access.
Not always. A rigid grid may ignore columns and create bright floor stripes. Use wider distribution in areas with lower ceilings. Keep cleaning and replacement routes accessible.
Entrance lighting should provide a gentle transition from bright streets. Use brighter vertical surfaces near reception, elevators, and key corridors. Keep walking paths evenly lit. Luggage wheels need clear visibility across floor changes.
General movement often needs about 200–300 lux. Reception desks and form-filling areas may need brighter task lighting. Local requirements and site conditions should guide final levels. The numbers are only a starting point.
Begin with soft ambient ceiling light. Add focused lighting at desks, seating areas, artwork, and routes. Use wall washing for gentle visual rhythm. Low-glare downlights can define paths without harsh reflections.
Drawings may hide glare on glass doors or shadows across counters. Test a sample ceiling bay at eye level. Review it during daylight and evening hours. Ask where people hesitate, squint, or avoid sitting. The first plan may be wrong.
Designing a multifunctional hotel hall begins with understanding how each area will be used, from reception and waiting spaces to meeting zones, circulation paths, and event areas. The process of how to design a lighting layout for a multi-functional hotel hall should consider natural daylight, ceiling height and structure, architectural features, and visitor movement. These factors help determine suitable fixture positions, illumination levels, color temperatures, glare control, and emergency visibility.
A successful plan combines ambient, task, accent, and decorative lighting to create a welcoming atmosphere while supporting safety, comfort, and visual clarity. Flexible control systems can adjust scenes for daily operations, meetings, celebrations, or quiet periods. During implementation, the design should also address energy consumption, installation coordination, maintenance access, and future changes to the hall’s layout or functions. This balanced approach creates a practical, adaptable, and comfortable environment for guests and staff.

Sienna Lights